
Block config and type
Here we are diving a bit deeper understand what the luya\cms\base\PhpBlock -> config() method of a block contains and which kind of types can be used. First we have to explain the available types of configurations and which are used to be configured by the user or the developer.
Block input / Output configuration
The config() method returns an array with all defined types for this current block, the first level defines the block types:
return [
    'vars' => [],
    'cfgs' => [],
    'placeholders' => [],
];
You only have to return the types you like to use in your block, if do not have placeholders your do not have to return it at all.
| Name | Function |
|---|---|
| vars | Variables where to user can enter data according to your type (select, text, radio, etc.). |
| cfgs | Those options are shown as well in the admin UI and are meant to be used optional options which could be use for developers. |
| placeholders | Defined placeholders allows you to mark an area where other blocks can be dropped and rendered. A common use case could be a div with given class where dropping nested blocks is allowed. It's very common to enable luya\cms\base\InternalBaseBlock -> $isContainer property when working with placeholders, this will render the block nicely with cols and rows (if configured). |
Now you can add a field into the above defined type, this is like a configuration of a field which must contain var, label and type:
[
    'var' => 'userInputText',
    'label' => 'Form Label for the User',
    'type' => self::TYPE_TEXT, // or as class constant: self::TYPE_TEXT
]
Required Input
Since version 3.4 of LUYA Module CMS it's possible to define a required property in order to ensure can not be empty.
Above, this would create an input variable with a text input field and a label From Label for the User. The type of the field can be added into a group you like:
return [
    'vars' => [
        ['var' => 'userInputText', 'label' => 'Description of userInputText', 'type' => self::TYPE_TEXT, 'required' => true]
    ]
];
Input block types
There are several types you can use to generate your block controllers. Each class which support those types implements the luya\admin\base\TypesInterface where you can use the type names as constant.
| Type Name | Constants | Description |
|---|---|---|
| zaa-text | TYPE_TEXT | Creates a simple string input text value field. |
| zaa-textarea | TYPE_TEXTAREA | Creates a multi-row text input element known as textarea |
| zaa-password | TYPE_PASSWORD | Creates a input password field which hides the input value behind * signs |
| zaa-number | TYPE_NUMBER | Creates a numeric value |
| zaa-decimal | TYPE_DECIMAL | Creates decimal input field with option: options="{'steps':0.0001}" to define step size. Default = 0.001. |
| zaa-link | TYPE_LINK | Create a link field for internal and external URLs |
| zaa-wysiwyg | TYPE_WYSIWYG | Creates a small wysiwyg editor |
| zaa-select | TYPE_SELECT | Creates a select drop down with options based on the options parameter. The options item must contain a value and label key, e.g. [["value" => "v1", "label" => "Value 1"], ["value" => "v2", "label" => "Value 2"]]. |
| zaa-radio | TYPE_RADIO | Creates a radio button selection based on the options parameter. The Options item must contain a value and label key, e.g. [["value" => "v1", "label" => "Value 1"], ["value" => "v2", "label" => "Value 2"]]. |
| zaa-date | TYPE_DATE | Creates a date picker where the user can choose a date, the response inside the block will be a Unix timestamp. |
| zaa-datetime | TYPE_DATETIME | Creates a date picker where the user can choose a date and provide an additional time, the response inside the block will be a Unix timestamp. |
| zaa-checkbox | TYPE_CHECKBOX | Creates a single checkbox (e.g. to define on/off states). |
| zaa-checkbox-array | TYPE_CHECKBOX_ARRAY | Create an array with checkboxes. |
| zaa-file-upload | TYPE_FILEUPLOAD | Creates a file upload form and returns the fileId on success. |
| zaa-file-array-upload | TYPE_FILEUPLOAD_ARRAY | Creates an array with file id and caption string. |
| zaa-image-upload | TYPE_IMAGEUPLOAD | Creates an image upload form and return the imageId on success. |
| zaa-image-array-upload | TYPE_IMAGEUPLOAD_ARRAY | Creates an array with image id and caption string. |
| zaa-list-array | TYPE_LIST_ARRAY | Creates an array with a key variable value. |
| zaa-multiple-inputs | TYPE_MULTIPLE_INPUTS | Creates an expandable list with plugins for each row. |
| zaa-color | TYPE_COLOR | A color wheel to choose a color which will return the hex code of the selected color. |
| zaa-slug | TYPE_SLUG | Input field which will generate URL safe strings where only a-z, 0-9 and - is allowed. |
| zaa-table | TYPE_TABLE | Generates a table generator where you can create cols and rows. |
Examples with block types
Example for file download (file upload) and Markdown text for textarea inputs, where the text is required.
public function config()
{
    return [
        'vars' => [
             ['var' => 'image', 'label' => 'Image', 'type' => self::TYPE_IMAGEUPLOAD, 'options' => ['no_filter' => true]],
             ['var' => 'text', 'label' => 'Text', 'type' => self::TYPE_TEXTAREA, 'required' => true],
             ['var' => 'download', 'label' => 'Download', 'type' => self::TYPE_FILEUPLOAD],
        ],
    ];
}

public function getText()
{
    return TagParser::convertWithMarkdown($this->getVarValue('text'));
}

public function extraVars()
{
    return [
        'text' => $this->getText(),
        'image' => BlockHelper::imageUpload($this->getVarValue('image'), false, true),
        'download' => BlockHelper::fileUpload($this->getVarValue('download'), true),
    ];
}
In the view you can access the values as followed:
<?php if ($this->extraValue('download') && $this->extraValue('image')): ?>
    <img src="<?= $this->extraValue('image')->source; ?>" />
    <?= $this->extraValue('text'); ?>
    <a href="<?= $this->extraValue('download')->href; ?>">Download File</a>
<?php endif; ?>
Placeholders
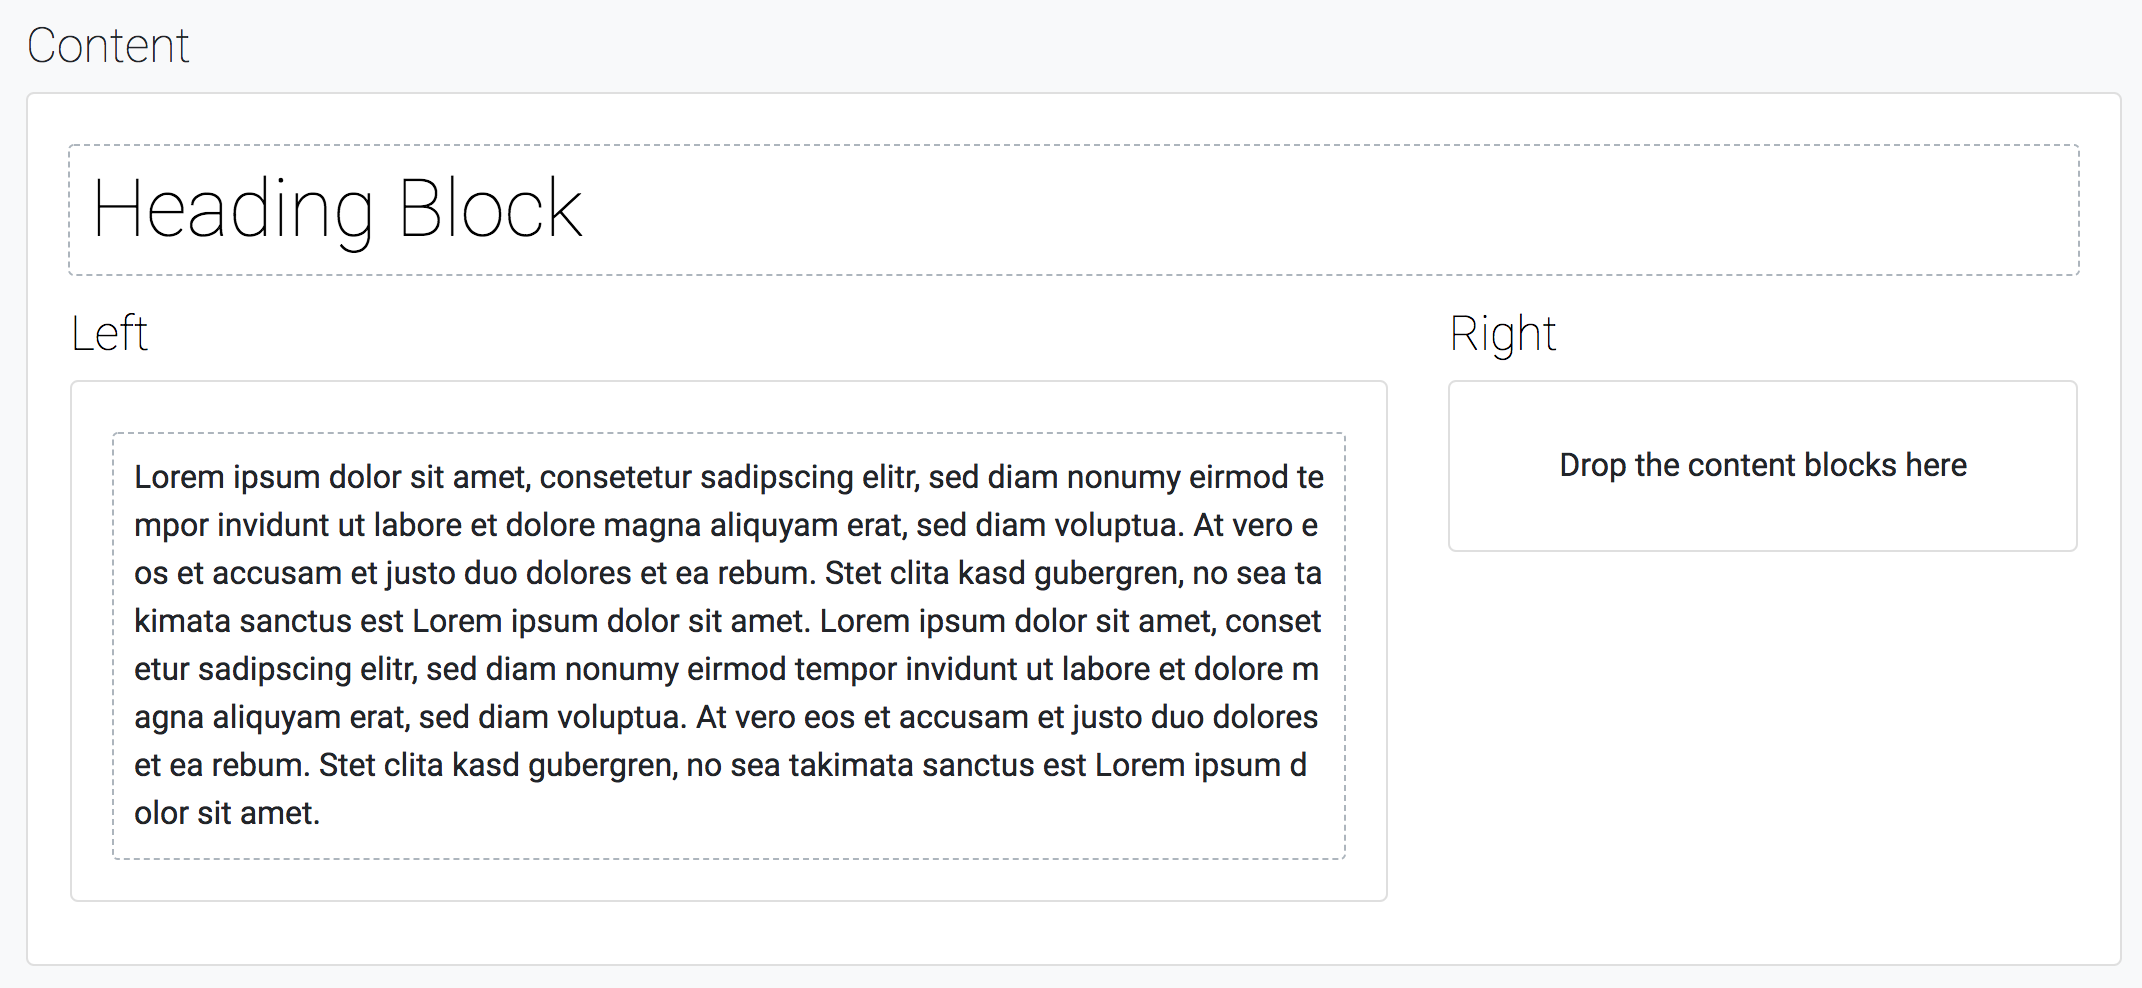
This is very strong feature of LUYA CMS block system. It allows you to create an infinite amount of recursions. Thinking of GRID system like Bootstrap, the placeholders are like cols where you can put other blocks. An example of a block configuration with placeholders:
public function config()
{
    return [
        'placeholders' => [
            [
                ['var' => 'left', 'cols' => 8, 'label' => 'Left'],
                ['var' => 'right', 'cols' => 4, 'label' => 'Right'],
            ]
        ],
    ];
}
The above example would generate 1 row with 2 columns. As Bootstrap 4 has at max 12 cols the first column would be larger then the second. Now you can enable luya\cms\base\InternalBaseBlock -> $isContainer which will render the placeholders nicely and different to casual blocks.
$isContainer has no admin view
When enabling the luya\cms\base\InternalBaseBlock -> $isContainer the luya\cms\base\InternalBaseBlock -> admin() output wont have no effect and is not rendered!
When enabling the cache for layout blocks, the full placeholder content will be cached to. So it's very common to disable caching for blocks with placeholders.
An example of how a view file for this layout block with placeholders could look like:
<?php
/**
 * @var $this \luya\cms\base\PhpBlockView
 */
?>
<div class="row">
    <div class="col-md-8">
        <?= $this->placeholderValue('left'); ?>
    </div>
    <div class="col-md-4">
        <?= $this->placeholderValue('right'); ?>
    </div>
</div>
Block injectors
A very common scenario is to collect data from an ActiveRecord model, display the items and select them (e.g. via select or checkbox) and then access the selected model rows via luya\cms\base\PhpBlock -> extraVars(). To achieve this a lot of code is required inside your blocks, which is good to understand what and why things happens, but if you need to get results quickly injectors are going to help you manage this kind of tasks.
Injectors can, as the name already says, inject data into your luya\cms\base\PhpBlock -> config() method and assign custom data to luya\cms\base\PhpBlock -> extraVars().
Lets assume we have news articles from an ActiveRecord model which you want to select inside the admin UI area and return the selected model rows. This can be defined via the luya\cms\base\PhpBlock -> injectors() method as a new injector as in the example below:
class MyBlock extends \luya\cms\base\PhpBlock
{
    // ...

    public function injectors()
    {
        return [
            'newsData' => new \luya\cms\injectors\ActiveQueryCheckboxInjector([
                'query' => \luya\news\models\Article::find(),
                'label' => 'title', // This attribute from the model is used to render the admin block dropdown selection.
                'type' => self::INJECTOR_VAR,
                'varLabel' => 'Select Articles', // The Block form label
            ])
        ];
    }
}
Now the generated injector ActiveQueryCheckboxInjector is going to grab all information from the defined query and assign them into the extra var newsData. Now you can access $extras['newsData'] which returns all selected rows from the checkbox you have assigned.
In order to append the injected variable to the end of the form use
'append' => true.
For example your view file could now look like this:
foreach ($this->extraValue('newsData') as $model) {
    echo $model->title; // assuming the title is an attribute of the Article model defined in the query part of the injector.
}
The following Injectors are currently available:
| Class | Description |
|---|---|
| luya\cms\injectors\ActiveQueryCheckboxInjector | Generates as checkbox selection from an ActiveRecord and assign the selected model rows into the extraVars section. In order to select only a specific fields add the select() to the ActiveRecord find ActiveQuery. |
| luya\cms\injectors\ActiveQueryRadioInjector | Generates a radio list |
| luya\cms\injectors\ActiveQuerySelectInjector | Generates a dropdown select |
| luya\cms\injectors\LinkInjector | Generates an ability to select a link and returns the correct URL to the link based on the user selection. |
| luya\cms\injectors\TagInjector | Generates a checkbox to select all available admin tags and provides API to return those selected tags. |
Injector API
Each injector object generate trough the luya\cms\base\InternalBaseBlock -> injectors() method can be access trough the magical array access. Let's assume you are registering the TagInjector:
public function injectors()
{
    return ['tags' => new TagInjector()];
}
Now you are able to access the TagInjector object trough the $this['tags'] ArrayAccess getter method.
Custom Types
In order to develop custom directive types you need to create a few things are required:
- A module which is registered and loaded (the module will provide the registration of the asset files). [[/guide/admin/intro]]
- An asset file which holds the AngularJS directive code. [[/guide/admin/assets]]]
- The AngularJS directive itself which is compatible with LUYA injector API.
An example code for a directive which is compatible with the injector API directive:
zaa.directive("myInput", function(){
    return {
        restrict: "E",
        scope: {
            "model": "=",
            "options": "=",
            "label": "@label",
            "i18n": "@i18n",
            "id": "@fieldid",
            "placeholder": "@placeholder"
        },
        template: function() {
            return '<div>Here you can add your code where `$model` is the value to change for your input.</div>';
        }
    }
});
Now after creating the module with the asset file and the JavaScript. You can use my-input directive (example code above) inside your block config as type.